
|
 01-04-2005, 09:24 AM
|
#1 |
|
Im gonna show her my...

Join Date: Dec 2004
Location: Somewhere providing FREE tech support.
Posts: 4,269
|
EvM Tri-Link install on a 96 Cobra *DUW*
In this post I will be detailing the installation of the EvM Tri-Link suspension component on a 1996 Cobra. Throughout the install I tried to take pictures and notate the individual steps that are of interest. If you have any specific questions about the install, just ask.
Car Specs Front: 350lb MM Coil-overs Bilstein Sport Strut Stock Cobra Swaybar Lowered 1†(27†ground to fender) Rear: 225lb MM Coil-overs Bilstein Sport Shock MM Panhard Bar Pro3i Race LCA’s (MM Knock offs) Product Most of you know about the EvM Tri-Link and what it does. If not you can read about it HERE. When the kit finally arrived I was impressed by the workmanship and finish of the parts. It’s not some cheap, flimsy, piece of junk that we have seen from other “suspension†companies. Although mine did not come with instructions (because it was the first production run) I received all of my parts in one shipment. If you would like to see what the kit looks like right out of the box, click HERE. Preparation Because I will be driving more that 150 miles away to install this kit I tried to do as much preparation as possible. Gathering up all the tools, inventory of all the parts, and reading through the instructions at least three times. I removed the rear seat delete and started with the first steps of the instruction, removing the mastic on the floor pan. I took the reinforcement plates and scribed a mark into the surrounding the mastic. Then using a scraper I removed the mastic as best I could. To clean up the adhesive I sprayed it down with some gasket remover and wiped up the byproduct with a paper towel. Nice and clean! 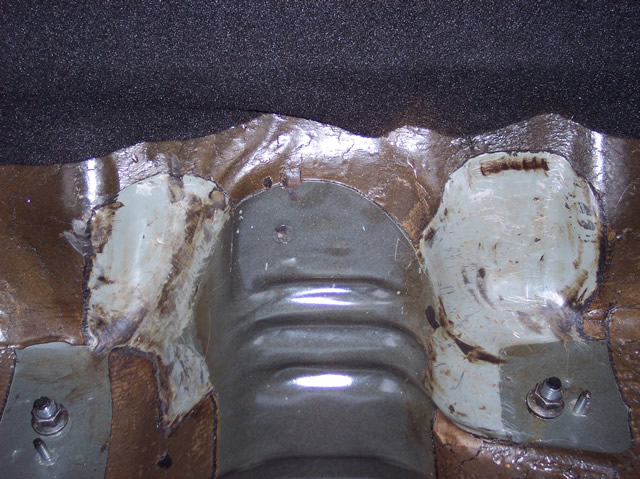 Rear Cradle After I got the car up on the lift and removed the panhard bar, I started on the rear cradle. Dumped the UCA’s and bushings in about 10 minutes, it was a breeze with the MM bushing tool. If you don’t have one, get one! 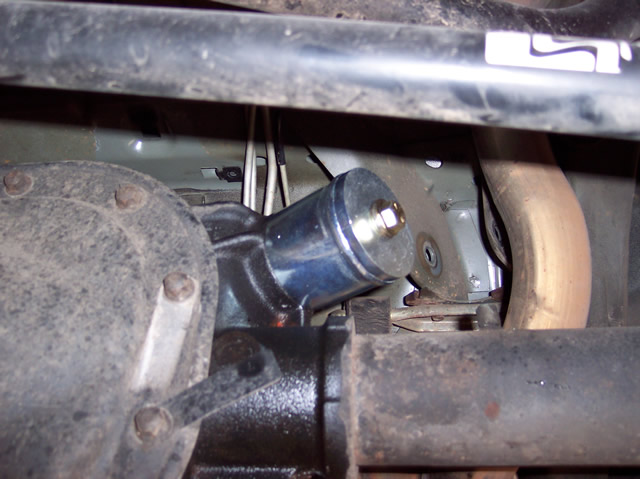 You have to do some creative stacking, but you can use the MM tool to install the solid bushings from the kit. The rest of the rear cradle install was easy as I had a stock differential cover. 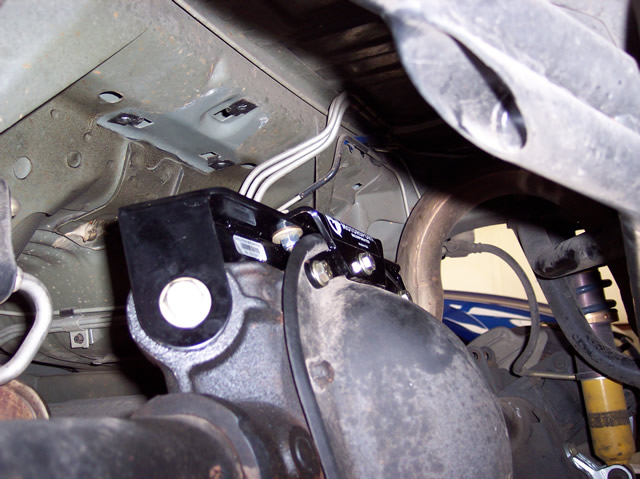 Front Cradle Next to go in was the front cradle. You are going to have to at least undo the exhaust hanger brackets to get the cradle in there. You can get away with keeping the driveshaft in place, but it’s a good idea to remove it for added elbow space. Also, undo the brake and fuel lines retainers located in the trans tunnel and the trunk floor. I went ahead and assembled the front “center link†attachment on the front cradle. This is where I ran into my first problem. It seems that the cap screw for the center link attachment was too long. Whenever I screwed the cap screw all the way in it was hitting the other side of the cradle leaving a 1/16†gap between the screw’s shoulders and mounting ear. EDIT: EvM has fixed this problem. My kit was one of the first produced which had some slight changes from the pre-production units. All kits are shipping with the correct washer stack. 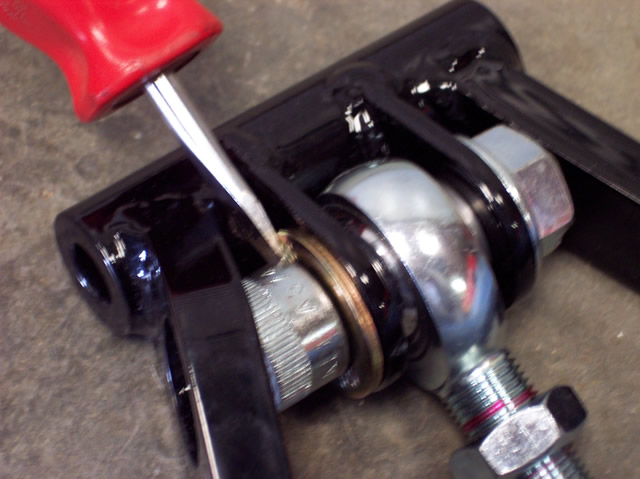 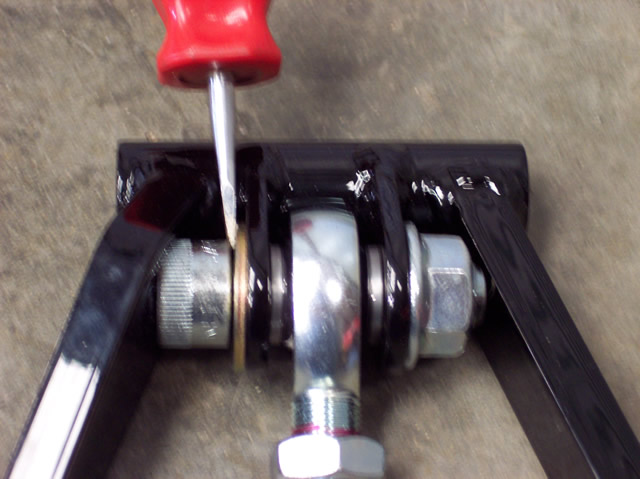 So I took one of the extra washers from the kit and added it to the stack. 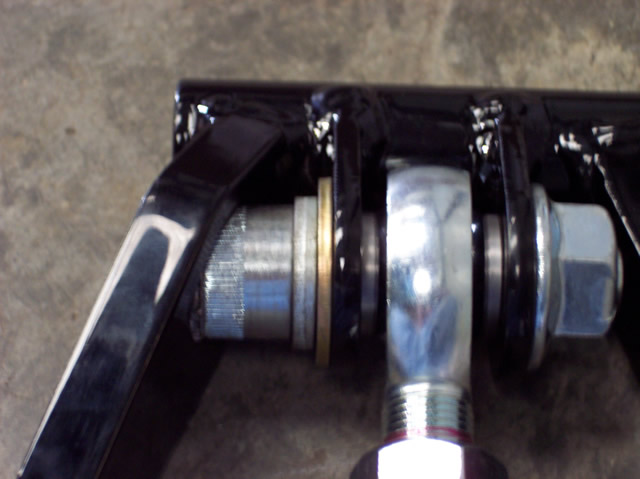 NOTE: This is not a recommended fix. Then using a ½†Hex Head socket I torqued the cap screw to 120 ft-lbs. (It did not say to in the instructions, but the rear of the link attachment was at this spec) Now you are ready to fish the cradle up into the tangle for single shear attachment. You could do this part alone if you’re part primate, but it took me: two humans, four hands, and one foot to complete this mount. 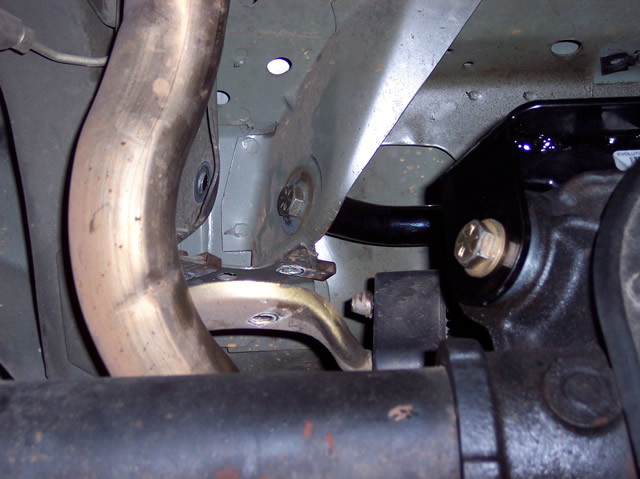 With the UCA attachments cinched up, its time to mark the floor pan for the U-bolts and “through bolt†holes for drilling. EvM’s instructions on marking the U-bolts are the best method, but I have something to share on how I marked the “through bolt†hole. Using a mechanics mirror (little bit bigger than the mirror your dentist uses) and a light I was able to bounce the light through the hole which came out as a perfect circle on the other side. (Thanks Brian) Another person was then able to mark the center of the “light†circle with a sharpie pen. This proved to make an accurate hole for the cradle. For some reason, my cradle mounted much higher in the trans tunnel than the one pictured in the instructions. My through bolt was REALLY long and I had to trim a lot off of the spacers provided for the front of the cradle. I ended up using the interior spacers on the exterior and exterior spacers on the interior. The stack ended up looking like this: Starting from Drivers Side = Exterior Spacer – Plate – Body – Washer – Interior Spacer – Cradle – Exterior Spacer – Washer – Body – Plate – Interior Spacer Front Cradle finished: 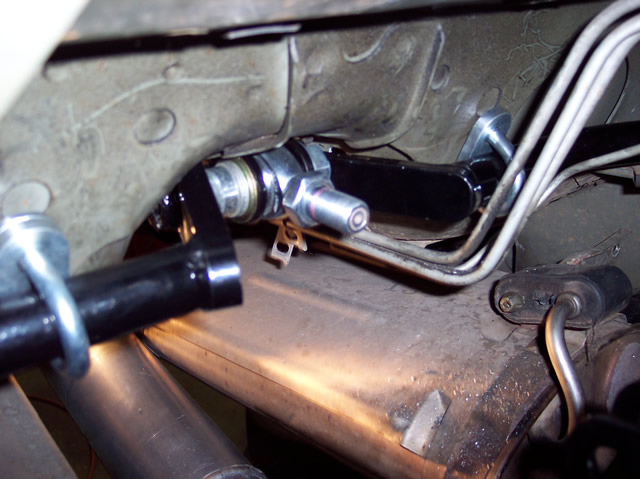 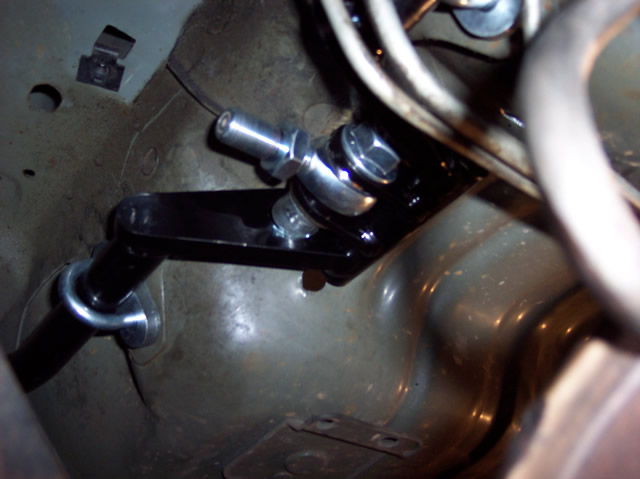 Center Link Nothing to exciting enough to report here. Just make sure you have the length correct and you torque the rear attachment correctly. Don’t forget to tighten the jam nuts or you could have a nasty surprise later! Here it is, buttoned up and ready for the drive home: 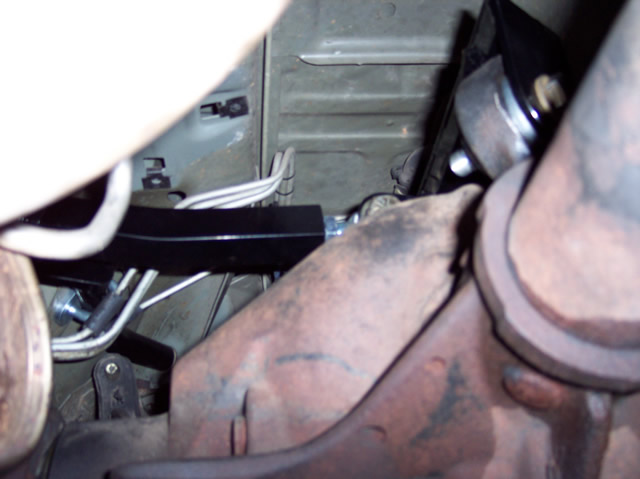 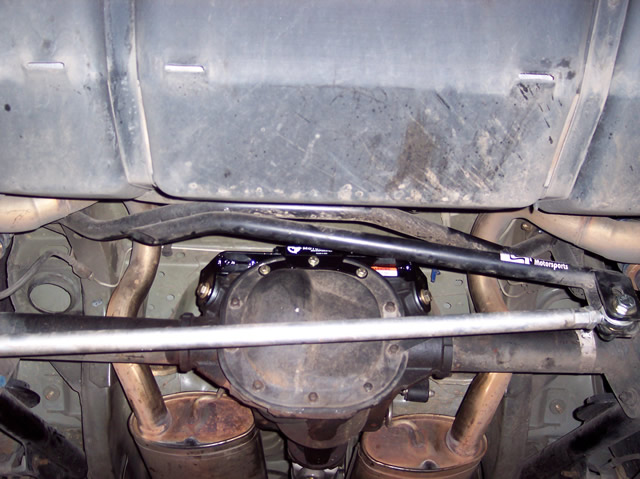 OPTIONAL: Double Shear Mounting, the $50 upgrade Since I intend to race this car at some point, I decided to do the double shear mounting. Whoa, there should have been a bigger warning in the instructions about this! First, following the instructions was not the way I was able to install the longer bolts. Maybe my floor pan is different, but as soon as I undid the UCA attachments, the cradle moved enough that the holes were no longer in alignment. The only option I had after prying on the bar for 30 minutes was to completely remove the front cradle. After walking the holes just a little and screwing up the threads on the cradle, a light bulb went off. Presenting my Double Shear Mounting measurement tool: 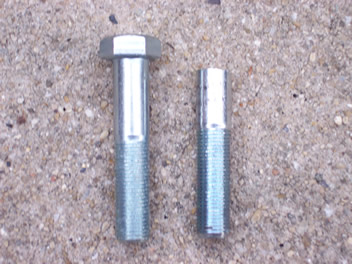 I found two “junk†½†bolts and cut just enough off of the bolt to allow it to pass between the UCA’s mounting points. This way I can thread the “tool†into one side of the cradle with the other side of the cradle tightened down via the single shear mount. As you can see from the pictures below, I now know how much to remove from the outer UCA mounting hole judging by how the “tool†sits in relation to the outer hole. Rinse and Repeat for the other side.  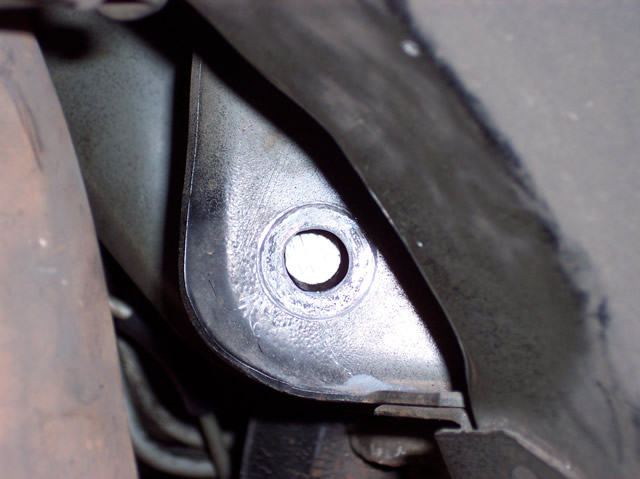 Using a high speed drill and a metal rasp I was able to elongate the hole just enough to finish the double shear mount. TIP: It would be wise to chase all threads with the appropriate tap and dyes. This will help you get that “feel†so you don’t cross thread anything! DON’T MAKE MY MISTAKE! Here is the double shear completed, it better be worth it! 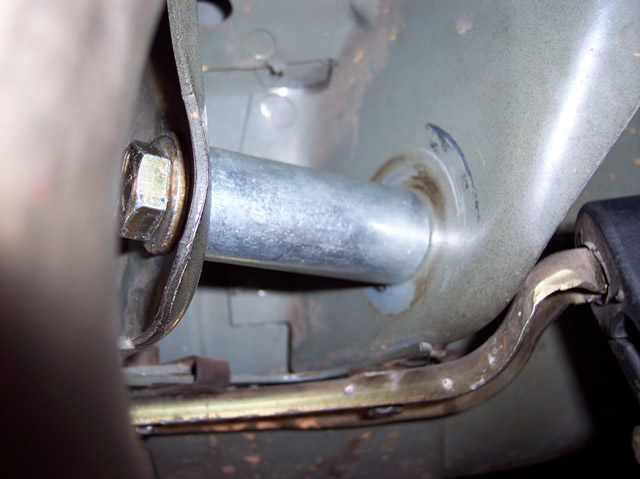 Final Thoughts and Driving Impressions Right off the bat, I noticed a drastic difference in the “feel†of my car. The tires bite extremely hard now and upshifts are met with a nice chirp instead of tire spin. Also, in off camber situations (speed bumps, uneven pavement, and potholes) the rear acts just like an IRS rear in that it flexes without the other tire leaving the ground or excessive body input. I set the anti-squat in the middle for testing purposes. No brake hop to report or any handling “surprises.†However, the noise increases two-fold with the addition of the solidly mounted axle. If you have a bad gear install or failing limited slip, you will know it post haste. I think I can make out the spider gears swirling around in the differential as the car is decelerating to a stop. EvM has said that most of their products will be marketed towards the “street performance†crowd, but I think the noise level will put it up towards hardcore idiots (like me) or the race only crowd. I won’t have any track time (drag or road course) for a couple of weeks, but I will report back when I do. If you have any questions, please ask. Overall, I am EXTREMELY please with the product. There are still some nit-picking things to iron out in the instructions and maybe some small product changes. I will recommend this product to anyone looking to improve their rear suspension. Thanks to Lee, Brian, Joseph, and Matt for providing manual labor. Allan for usage of your shop. Jennifer and Meredith for getting lunch. You guys are awesome!
__________________
I heard it on the internet, so it must be true. "I believe that a person's moral compass can be determined by how he references free men the right to defend themselves." T. Nugent "An armed society is a polite society. Manners are good when one may have to back up his acts with his life." R. Heinlein "Never argue with an idiot. They drag you down to their level, then beat you with experience." -Unknown |

|

|
|
01-04-2005, 10:03 AM
|
#2 |
|
Friends

Join Date: Dec 2004
Location: Tempe Arizona
Posts: 3,029
|
Re: EvM Tri-Link install on a 96 Cobra *DUW*
Good Job Nathan!!
|
|
|
|
|
01-04-2005, 12:03 PM
|
#3 |
|
Friends
Join Date: Dec 2004
Posts: 908
|
Re: EvM Tri-Link install on a 96 Cobra *DUW*
Looks sweet!

__________________
02 GT S/C'd 406WHP/382WTQ 94 Explorer XLT |
|
|
|
|
01-04-2005, 01:06 PM
|
#4 |
|
Censored Jihad

Join Date: Dec 2004
Location: B'ham, AL
Posts: 4,108
  |
Re: EvM Tri-Link install on a 96 Cobra *DUW*
great write up Nathan
__________________
Theres only one way to get to Carnegie Hall..... .... Practice. |
|
|
|
|
01-04-2005, 01:36 PM
|
#5 |
|
.RAR

Join Date: Dec 2004
Location: Morris, AL
Posts: 510
 |
Re: EvM Tri-Link install on a 96 Cobra *DUW*
nice writeup man. Put that one down in the books.
Mike |
|
|
|
|
01-04-2005, 01:46 PM
|
#6 |
|
Administrator
Join Date: Dec 2004
Location: Huntsville, AL
Posts: 14,774
|
Re: EvM Tri-Link install on a 96 Cobra *DUW*
Have you put the RSD back in? Is it still really loud inside with it back in?
__________________
1998 Mustang GT Coupe - World's Slowest Racecar 2005 Toyota 4Runner SR5 V8 2013 Volkswagen Jetta Sportwagen TDI |
|
|
|
|
01-04-2005, 02:39 PM
|
#7 | |
|
Im gonna show her my...
Join Date: Dec 2004
Location: Somewhere providing FREE tech support.
Posts: 4,269
|
Re: EvM Tri-Link install on a 96 Cobra *DUW*
Quote:
__________________
I heard it on the internet, so it must be true. "I believe that a person's moral compass can be determined by how he references free men the right to defend themselves." T. Nugent "An armed society is a polite society. Manners are good when one may have to back up his acts with his life." R. Heinlein "Never argue with an idiot. They drag you down to their level, then beat you with experience." -Unknown |
|
|
|
|
|
01-04-2005, 03:52 PM
|
#8 |
|
Administrator
Join Date: Dec 2004
Location: Huntsville, AL
Posts: 14,774
|
Re: EvM Tri-Link install on a 96 Cobra *DUW*
Maybe that stuff KB used in his '03 L would work?

__________________
1998 Mustang GT Coupe - World's Slowest Racecar 2005 Toyota 4Runner SR5 V8 2013 Volkswagen Jetta Sportwagen TDI |
|
|
|
|
01-04-2005, 04:06 PM
|
#9 | |
|
Daddy x4 ...we're done

Join Date: Dec 2004
Location: Oxford, AL
Posts: 11,551
|
Re: EvM Tri-Link install on a 96 Cobra *DUW*
Quote:
__________________
-Brian '86 Mustang GT Convertible '88 Mustang LX coupe '11 Odyssey TE '21 Insight Touring |
|
|
|
|
|
01-04-2005, 04:16 PM
|
#10 |
|
They call me CrazyFingers

Join Date: Dec 2004
Location: Westavia Hills
Posts: 2,377
|
Re: EvM Tri-Link install on a 96 Cobra *DUW*
Awesome nate. I was watching their stuff like a hawk. I was actually very close to buying their project 03 GT which had the watts setup, 3 link, sypder brace up front, full subframe kit and full spintech exhaust and 150 shot N2O kit.
As with all brand new products, there's always bound to be a few engineering mis-calculations. Same thing happend with their radiator V-brace that I installed. Their directions had no mention of the oil cooler which was on my car and in the way of the install  I forget which guy it was that works there but he gave me a discount on my next purchase there and a free T-shirt!
__________________
- Drew - 2017 Dodge Charger ScatPack 392 2016 Mazda CX9 Signature Edition - Hers 1999 Volvo S70 T5 - Un-killable beater (Always for sale) 
|
|
|
|
 |
|
|


 Linear Mode

